Capture It at the Front Door: Why You Should Have an Entryway Organizer

Lauramartinezphoto/Twenty20

As a professional home organizer, I typically tackle the home entryway first. Sans functional system, it’s far too easy for this high traffic area to turn into complete mayhem. If all of the items that enter and exit your home on a daily basis don’t have a designated place to be stowed, you might find yourself confronting a jumbled pileup of hats, scarves, coats, umbrellas, bags, and papers by the door — who wants to deal with that?

Here’s the good news: setting up an organized and functional entryway doesn’t take much effort and will make a major difference in your day.

By creating a place for these items, they won’t end up strewn across your home, possibly in random places. This will help eliminate those stressful cleanup situations at the end of the day. What’s more, imagine being able to find everything you need within seconds, and coming home to a tidy, organized entryway. It can set the mood as you enter and leave the house.

7 simple steps to organize your entry

Before you organize your entry, there’s a few mindful clean-ups you might want to make. Think of these early steps as the foundation to the “don’t just dump that there” muscle memory we’re building.

1. Do the relocate shuffle

Step one is as simple as taking a good look at your entryway. Identify which items have lost their way and need to take a hike. Grab a bin or basket to gather up the items that need to be relocated (toys, coffee cups, credit cards) and take a few minutes to put them back where they belong.

2. Clarify your entry goals

Make sure you have clear and specific goals:

  • If you want to create a better first impression of your home, your entryway should be free of junk and clutter.
  • If there’s a lot of housemates or family members, you want to make sure there are clearly designated places for people to store their stuff.
  • Maybe you just want to find your keys.

Whatever your goals are, keeping them close by will help anchor the hands-on work ahead.

3. Cut the clutter

Now that you’ve defined you goals for the space, it’s time to cut down the clutter. Editing the volume of stuff that you own and store in your entryway will make it easier to maintain it. So, gather up the goods, and make sure to keep a donation bag close at hand. Sort into “keep” and “donate” piles, keeping only the items you use, love, and wear.

4. Organize by category

Being able to see exactly what you own and want to store in your entryway will help clarify what systems you need to set up later. (Again, consider the items you’re commonly picking up or dropping off as you come and go. Is it convenient to store your dog leash and jacket by the front door?) If you’re staring at anything you don’t want to keep at your entryway, now’s the time to find another home for it.

Next, sort the items that made it into categories. The most common items are coats, bags, hats, scarfs, umbrellas, dog leashes, kid or baby gear, sunscreen, hand sanitizer, mail and bills, etc.

Keep in mind that — depending where you live — your climate may oblige you to rotate and relocate seasonal items. For example, you don’t need quick access to snow boots and winter jackets in the middle of July.

5. Make a list, check it twice 

Now that you’ve determined your categories, it’s time to write down all of the items that currently require a storage solution. By taking an inventory of exactly what you need to store, you can identify everything you must create a “home” for. So, maybe you need a shelf for shoes, hooks for jackets, and several baskets for sorting items such as masks, sunscreen, mail and so on. (The extent of your sorting may depend on how many people are in your household. Either way, you want a designated landing spot for every item you plan to keep in the entry.)

If you’re aiming for a minimal entryway (or if you have limited space in your entry), rank the categories. If you want to pare down further, start by crossing the lowest priority items to keep at the entry. Remember to take into consideration what might simplify your routine as you come and go.

6. Set up shop

Next it’s time to create an assigned place near the front door for each item on your list. If you don’t have a mudroom or generous sized entry closet, you can still create a functional entry station.

  • Sturdy hooks. These work well for coats, dog leashes and bags. Make sure the hooks are mounted at arm’s reach for kid backpacks and jackets, so they can be responsible for their own things. 
  • Shoe storage. A storage credenza, free standing shelves, cubbies, or labeled bins or baskets will do the trick for shoes. (I encourage clients to store the majority of shoes in their bedroom closets.)
  • “Little things” bowl / basket. A pretty ceramic dish or shallow basket works well for tossing keys, cell phones, and loose change. 
  • Paper storage. For mail and magazine storage I love installing wall pockets, or simply placing a large, pretty basket on your entry table. 
  • For kids and pets. If you have kid or pet gear or seasonal items, you can use open bins or storage baskets to keep things tidy. It’s also super helpful to set up a labeled bin or wall pocket for each child’s homework and school forms. 

Use what you have, and fill in any gaps by ordering what you need.

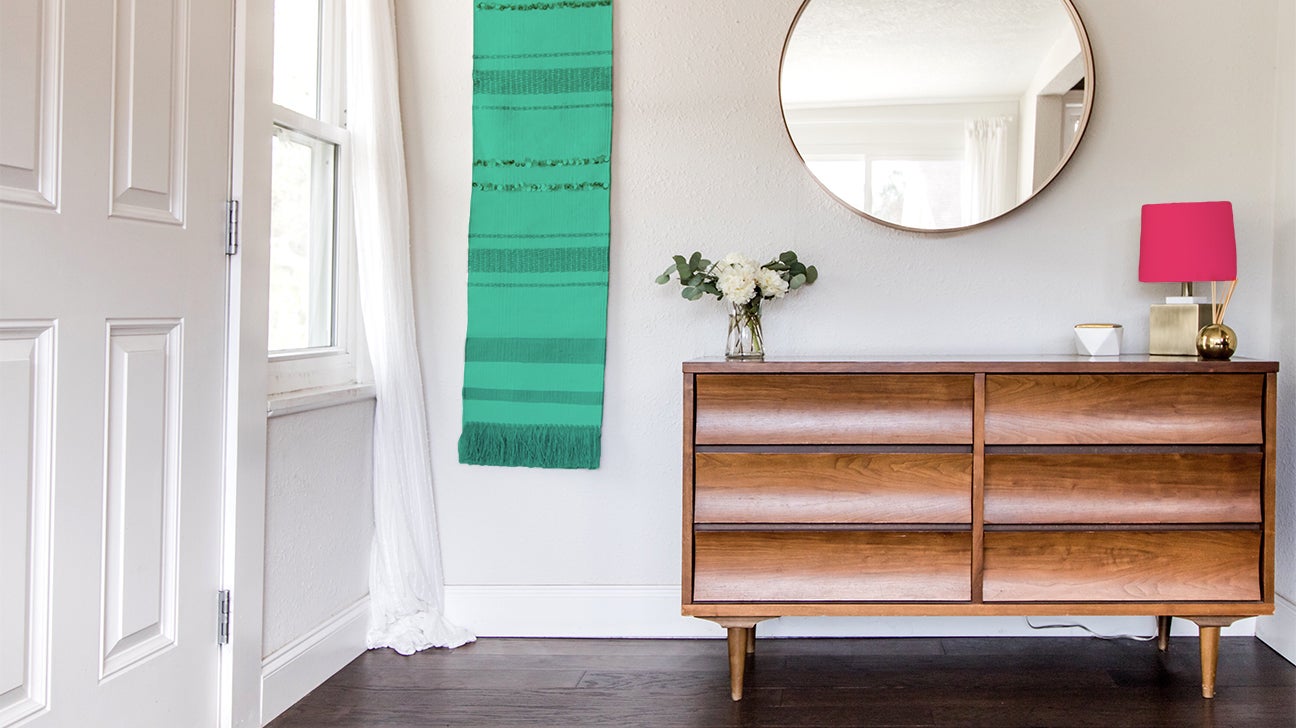
7. The finishing touches 

Your entry area is the first thing you see when you walk in the door after a busy day. It really pays off to create a pretty and functional space. Once you’ve organized and set up some simple systems, you can elevate your space with some easy details. Get creative and shop your own home: Hang a mirror or a favorite photo or piece of art. Add a potted plant or fresh flowers. A small rug or runner will create texture and warmth.

Even though most of us aren’t leaving the house much right now, when life returns to “normal,” we’ll be extra glad we took the time to set our entryways up for success.

Shira Gill is a home organizing expert and author with a less is more philosophy. Her book, MINIMALISTA, will be released fall of 2021.


from Greatist Health RSS Feed https://bit.ly/3bKCNwv

The Stages of a Cold Sore, from Beginning to End

Cold sores are red, fluid-filled blisters that usually appear near or around your mouth, usually at the worst possible time (think the morning before you’re about to give a big presentation at work or the moment before a date).

They develop in specific stages that can help you spot them. These sores can be caused by the herpes simplex virus type 1 (HSV-1) or type 2 (HSV-2) and can transmit to others easily, even when the sore isn’t yet visible. So it’s important to be aware when they’re developing.

Though they typically occur around the lips, they can actually appear anywhere on the skin, with the next most common location being around and up the nose. Ouch.

Cold sores usually resolve without leaving a scar within 5 to 15 days.

If you regularly experience cold sores, then you can probably tell when one is getting ready to make its grand appearance.

The 5 cold sore stages

This is the life cycle of a cold sore:

  1. tingling
  2. blistering
  3. weeping
  4. crusting
  5. healing
female mouth indicating coldsore header
Lucas Ottone/Stocksy United

How the 5 cold sore stages look and feel

You may be an old hand with cold sores and spot a flare from miles away. However, if you’re new to them, you might not know it’s a cold sore at first. But it can still spread during the early stages.

Stage 1: Tingling

You might feel an unexplained tingling around your mouth, but otherwise, the area probably doesn’t look any different. Some people don’t experience this stage though.

The cold sore is about to appear. This is a good time to attempt treatment — it can reduce the severity of the cold sore and shorten the duration of its stay (lol, bye). It can even prevent the cold sore from coming out altogether.

Stage 2: Blistering

Anywhere from a few hours to 2 days after the tingling, one or two fluid-filled blisters will appear on the skin’s surface. The skin under and around the blisters will be red. 

Stage 3: Weeping

After a few days, the cold sore will break open and will look red and shallow.

🎼 While my cold sore gently weeps…🎤

Stage 4: Crusting

At this stage, the blister starts to dry out. It will look yellow or brown.

Stage 5: Healing

Aah, finally. 🙏

During the healing stage, the crusted blister will scab over. It will slowly start to disappear as it flakes away.

Pictures of the cold sore stages

Our handy visual guide will help you understand the appearance of each stage.

Cold sore stages

stage 1 of cold sore

Stage 1 of cold sore: Tingling

Individuals can often feel a cold sore before it happens. These symptoms include itching, burning, tingling, and possibly pain.

Krystofos/Pixabay

stage 2 of cold sore

Stage 2 of cold sore: Blistering

A few days after initial tingling sensation, a blister will often form.

Photo: DermNet New Zealand

stage 3 of cold sore

Stage 3 of cold sore: Weeping

After the blister forms, the cold sore will break open and have some fluid that leaks out.

Photo: DermNet New Zealand

stage 4 of cold sore

Stage 4 of cold sore: Crusting

A crust will form over the site of the cold sore and is often yellow or brown.

Photo: DermNet New Zealand

stage 5 of cold sore

Stage 5 of cold sore: Healing

Eventually the cold sore will heal and should not leave a scar.

Getty Images

What to expect: An in-depth look at the stages

Here’s what to expect during a cold sore breakout — from beginning to end. 

Tingling

A cold sore begins before you can even see it. If you feel an unexplained tingling around your mouth, a cold sore might be coming out to play.

This is usually one of the first signs that a cold store is developing. You might also feel a burning or itching.

At this point, you can and should start treating your cold sore. While treating it right away will not prevent the sore from forming, it could reduce its severity and how long it lasts.

Managing stage one

At this phase, oral medication is the most effective remedy.

If you experience cold sores a lot, talk to your doctor about taking daily medication to prevent or limit outbreaks. They would prescribe one of the following options:

  • Acyclovir (Zovirax)
  • Valacyclovir (Valtrex)
  • Famciclovir (Famvir)

If you only get cold sores once in a while, the preferred treatment is still oral medication. But you don’t need to take it daily between cold sores.

Unless your doctor has suggested otherwise, applying a topical cream might provide extra benefits alongside oral meds. These include:

  • Doscosanol (Abreva), which is available over the counter
  • Acyclovir (Zovirax), by prescription only
  • Penciclovir (Denavir), by prescription only

The first stage of a cold sore might be painful or uncomfortable. If so, you can try taking an over-the-counter (OTC) pain reliever like acetaminophen (Tylenol) or ibuprofen (Advil). You might also get relief from a cream like lidocaine or benzocaine.

Blistering 

After about a day or 2 of the tingles, your cold sore will become visible in the blistering stage.

At this point, one or more blisters full of clear fluid will appear on the skin’s surface. The skin around the blisters will be red. They can develop on or inside your mouth (and even in your throat — no thanks).

Managing stage two

It may be a good idea to start using a pain reliever, oral medication, or topical cream at this stage (if you weren’t already during stage one). You should also drink as much water as possible.

Staying hydrated is important, especially when your mouth is sore. 

Throughout every stage of cold sore symptoms, you might feel discomfort while eating. It’s best to avoid foods that will irritate the sore, such as: 

  • citrus
  • spicy foods
  • salty foods
  • hot liquids

If you can see a cold sore, it’s more contagious

A visible cold sore is highly contagious and can easily transmit HSV-1 to others.

Be sure to wash your hands with warm, soapy water whenever you touch the affected area. It’s also important to avoid sharing food or drinks with anyone else during this time.

HSV-1 can also transmit through kissing and oral sex. So limiting intimate contact is also a good idea during a breakout.

Weeping

The third stage comes a few days after the cold sore appears on your skin. It will break open and will look red and shallow.

During this stage, HSV-1 is likely to pass from one person to the next. This is because the cold sore releases its fluid (yuck).

Managing stage three

If you haven’t started using a topical or oral pain reliever to help with symptoms, this is a good time to kick off your relief. You can also soothe pain and discomfort with a cold or warm compress.

Crusting

Once the weeping stage is over, your blister will begin to dry out. So begins the crusting stage.

As the blister dries, it will look yellow or brown.

Managing stage four

For relief, you can use:

  • a cold compress
  • a warm compress
  • zinc oxide ointment

Avoid temptation — don’t pick at cold sores

It’s tempting to pick at the sores, but try not to.

Picking can make them more severe or increase the risk of transmission. If bacteria enters the wound, picking cold sores can even create a bacterial skin infection.

So it’s best to pick another hobby.

Healing

The healing stage is the final stage. (And now, the act you’ve all been waiting for…)

The crusted blister will begin to scab over as it heals. Since this can be uncomfortable, you can try to keep the scab soft by using emollients containing zinc oxide or aloe vera.

As the scab flakes away, it will slowly clear up. People usually reach this stage around 5 to 15 days after noting symptoms.

Cold sores generally don’t leave a scar behind. (Hooray!)

How a cold sore develops 

Cold sores develop because of the herpes simplex virus — either type 1 (HSV-1) or type 2 (HSV-2).

The sores that develop after either virus enters the body are very similar in appearance. Both can cause sores on the genitals or mouth. 

The herpes virus is highly contagious and can spread even if the sores aren’t visible. You can spread herpes through close contact like kissing, oral sex, or sharing cosmetics or food.

Herpes is also extremely common: up to 90 percent of adults have the virus, and as many as 50 percent of people develop the condition by the time they’re in kindergarten. Not everyone with herpes will experience cold sores.

There is no cure for herpes. It might be dormant in your body for years before a cold sore ever appears on the skin. Once sores heal, the virus can go back to being dormant until a trigger reactivates it.

Triggers 

After exposure to the herpes virus, you will generally get a cold sore after triggers cause the virus to flare up. These triggers can be different for everyone.

Some examples include:

Areas that cold sores develop

Cold sores due to HSV-1 generally form on or in your mouth. They can also develop on your cheeks, nose, and eyes.

When to see a doctor 

It’s possible to treat the occasional cold sore at home. Over-the-counter medication can speed up the healing process and provide relief.

If you get cold sores on a fairly regular basis, you may want to see your doctor for prescription medication. This can reduce how often they occur and make them less severe when they do.

You should seek consultation if a cold sore:

  • spreads to your eye (this is an emergency and can cause vision loss)
  • develops alongside a fever
  • doesn’t clear up in a week or 2
  • causes crusted or oozing skin

Takeaway

Cold sores are red, fluid-filled blisters caused by the herpes simplex virus.

There are five stages to a cold sore: tingling, blistering, weeping, crusting, and healing.

Cold sores are a result of the herpes virus, which can lay dormant in your body until a sore comes up on the skin. Different factors can trigger a cold sore, such as a weakened immune system, stress, and hormonal changes.

Cold sores can develop on or inside the mouth, and less commonly on the cheeks, nose, and eyes.

You should see a doctor if you regularly get cold sores. A doctor can also help if they travel to your eye, don’t go away after a week or 2, or become surrounded by crusty skin.


from Greatist Health RSS Feed https://bit.ly/3bFCCTn

11 Best Teas to Kick Those Allergies This Spring

Tea isn’t just for soothing self-care sessions. Certain teas can also make a bomb remedy for coughs, sore throats, and sleep issues.

This might make ya think 🤔 : Can tea also help with those annoying seasonal allergies?

You bet. Teas that might help relieve common allergy symptoms include:

  1. nettle tea
  2. ginger tea
  3. lemon peel tea
  4. peppermint tea
  5. licorice root tea
  6. green tea (Benifuuki Japanese)
  7. turmeric tea
  8. yerba mate
  9. tulsi tea
  10. butterbur tea
  11. rooibos tea

But before you get steeping, here’s what science has to say about these herbal elixirs for allergies.

tea for allergies
CACTUS Creative Studio/Stocksy United

Why try herbal tea for allergies and relief?

Some teas contain herbs that may fight inflammation and help your immune system, which in turn could alleviate some allergy symptoms.

Seasonal allergies — aka allergic rhinitis or hay fever — usually pop up in the spring, summer, and early fall. Basically, allergies are part of your body’s immune response to pollen, grass, or other common environmental allergens.

This leads to inflammatory signals that bring on bouts of allergy symptoms like these:

  • sneezing
  • stuffy or runny nose
  • fatigue
  • itchy, red, watery eyes

What’s good: Best teas for allergies

Know before you steep: Fresh or dried herbs are best for optimum allergy relief. But if there’s simply no time for that, make sure you’re grabbing only unbleached tea bags. 

And always make sure to run herbal teas by your doc if you’re taking medication or have a health condition.

1. Nettle tea 

Stinging nettle is a perennial flowering plant that sprouts up in North America, Europe, and Asia. This common plant can actually be eaten (yum), but it’s also used in herbal and traditional folk medicine.

One 2018 review looked at nettle’s effect on the receptors and enzymes involved in allergic reactions. Studies found evidence that suggests it’s a helpful remedy for common hay fever symptoms.

How to make it: The American Botanical Council recommends steeping 2 to 3 teaspoons of dried nettle leaves in about 1 pint of boiling water for 10 to 15 minutes.

Hot tip: One 2016 study recommends steeping nettle tea for 10 minutes in 122 to 140°F (50 to 60°C) water, stating it’s the best way to preserve the herb’s vitamin C content.

Stock up: Try Tealyra Pure Nettle Leaf Tea.

2. Ginger tea

Ginger tea is often praised as a natural remedy for nausea, but it might also help your temperamental nose.

A 2010 study found that natural ingredients like ginger can be made into a tea to lessen allergy and sinusitis symptoms.

How to make it: Cut 4 to 6 thin slices of peeled, raw ginger (if you want it stronger, add more). Fill a medium pot with 2 cups of water. Plop the ginger slices in the water and let ’em boil gently for 10 to 20 minutes (the longer you boil, the stronger and spicier the tea will be).

Hot tip: Add juice from half a lime or lemon (dealer’s choice) and some honey or agave nectar liven things up.

Stock up: Try Traditional Medicinals Organic Ginger Herbal Tea.

3. Lemon peel tea

Lemons are already full of the powerhouse vitamin C, but you can also use just the peel for a potent tea. While there’s no research on the tea itself, we have limited information about the fruit.

A 2010 study found that the peels of citrus fruits such as grapefruit, lemon, lime, and orange contain high levels of antioxidant compounds. A super small 2009 study also found that lemon juice was helpful in treating allergic rhinitis.

How to make it: Grab a fresh lemon and carefully peel off half the rind. Plop the rind into a mug and add 2 cups of boiling water. Let it steep for about 5 minutes. You can also use dried lemon peel, steeping it for the same amount of time.

Hot tip: Some folks prefer to drink this with sugar, lemon juice, and fresh mint.

Stock up: Try Frontier Co-op Lemon Peel Granules.

4. Peppermint tea

This tea is cooling, which makes it a go-to for sore throats. But some research on peppermint essential oil suggests that peppermint may also be helpful for stuffy noses.

A 2006 review also found that peppermint tea has antimicrobial and antioxidant properties.

It’s also not a bad choice for freshening any sinus breath!

Stock up: Try Twinings of London Pure Peppermint Herbal Tea.

5. Licorice root tea

No, this isn’t your fave candy — licorice root is an herb derived from the licorice plant (Glycyrrhiza glabra). Licorice candy usually doesn’t even contain the herb (💫 the more you know).

Research from 2011 suggests this herb may help reduce inflammation (like the kind that makes swelling happen, thanks to your seasonal allergies). It also kills off certain fungi, bacteria, and viruses.

And while more human studies are definitely needed, a 2018 study on mice found that licorice reduced the frequency of cough by up to 78 percent.

Stock up: Try Traditional Medicinals Organic Licorice Root Tea.

6. Green tea (Benifuuki Japanese)

This cultivated type of Japanese green tea contains high levels of methylated catechins and epigallocatechin gallate (EGCG), both of which are known for their anti-allergic effects.

A 2013 study found that Benifuuki green tea was particularly handy for reducing symptoms of allergic reaction to cedar pollen.

Stock up: Try Shizuoka Benifuki Green Tea for Hay Fever.

7. Turmeric tea

Turmeric is a famous anti-inflammatory badass. Curcumin, its active ingredient, has a ton of antioxidant, anti-inflammatory, antiviral, and antibacterial properties that can help with immune function.

Drinking up these anti-inflammatory benefits via turmeric tea may help reduce irritation and swelling triggered by allergic rhinitis.

While we need more studies on how the herb affects allergies in humans, a 2008 study showed that turmeric reduced allergic reactions in mice.

How to make it: Add 1 to 2 teaspoons of ground turmeric to 2 cups of boiling water. Let it simmer for about 10 minutes, and then strain into a cup.

Hot tip: Add a dash of black pepper to help your body better absorb all those turmeric benefits.

Stock up: Try Organic Turmeric Ginger Tea Bags.

8. Yerba mate

Yerba mate, a South American plant with a caffeine kick, contains saponins, a natural compound with anti-inflammatory properties.

It also offers small amounts of vitamin C, vitamin E, selenium, and zinc. All these nutrients have antioxidant properties that may help boost your immune system and encourage overall better health, according to some research.

However, researchers have yet to study the direct influences of yerba mate on the human immune system and allergies.

Stock up: Try Organic Yerba Mate Loose Leaf Tea.

9. Tulsi tea

Tulsi, aka holy basil, is an adaptogenic herb. Research suggests it has antimicrobial properties and may help protect your body from stress.

Additional research from 2016 suggests that tulsi helps reduce stress by blocking the release of the hormone cortisol.

The herb may also help boost your energy, which we know can be super necessary when you’re battling brutal allergy symptoms.

Stock up: Try Organic India Tulsi Original Herbal Tea.

10. Butterbur tea

Butterbur is a plant that pops up in marshy areas and is a popular remedy for nasal symptoms.

A 2013 study that looked at herbal treatments for allergic rhinitis in Turkey found that butterbur tea was as helpful as the antihistamine fexofenadine (aka Allegra) for allergy symptom relief. 

A 2006 study also found that butterbur could stifle allergic reactions in rats. And in a 2001 study on humans, participants who took butterbur tablets for 1 week saw improvement in their allergy symptoms.

Stock up… if you can: Unfortunately, butterbur tea is practically impossible to find. If you can find it at a specialty tea shop, you’re in luck!

11. Rooibos tea

Rooibos herbal tea is made from a shrub in South Africa that has a reddish hue when steeped. The herb contains loads of antioxidants, including aspalathin and quercetin.

Studies on rooibos tea have been small. Some research suggests it can temporarily increase your antioxidant levels, while other studies suggest that your body doesn’t absorb the antioxidants very well.

As far as specific allergy relief goes, we don’t have any solid info. But rooibos still makes a tasty, caffeine-free tea.

Stock up: Try My Red Tea Rooibos Tea.

But is tea for allergy relief just a placebo effect?

Sometimes a participant in a clinical trial receives an ineffective medication still sees improvement. This is called the placebo effect. It happens because they believe the fake medication (usually a sugar pill) has had a positive effect on their health condition. 

It’s possible to experience this same effect when drinking tea for allergies. You might attribute allergy relief to your fave tea since a hot cup of tea is irresistibly soothing and relaxing AF.

But that’s still a pretty good reason to drink up in our book. 

Bottom line

Some herbal teas have science on their side when it comes to seasonal allergy relief, while some have only theoretical science to back them up for now. 

It’s always a good idea to run any herbal tea by your doctor before trying it. They can let you know how much to drink and whether there’s a chance it could mess with any meds or health conditions you have.


from Greatist Health RSS Feed https://bit.ly/3aZgPXq

16 Benefits That Put the “Ooh” in Oolong Tea

Not a big fan of green tea, but still looking for a tea that’s your perfect matcha? Meet oolong.

Oolong tea, like green and black tea, is made from Camellia sinensis leaves. But while green tea and black tea represent two extremes of the fermentation spectrum (green tea is not fermented and black tea is fermented until it turns, well, black), oolong is just chillin’ in the middle.

Depending on how long it’s aged, oolong tea can range from green to dark brown in color. And the flavor? Light and floral, but way less perfumey than green tea.

Best of all? Like country rap, it’s a mash-up of all the best things about green tea and black tea. We can git up for that.

Here are 16 health benefits that will have you longing for oolong.

1. Protects brain function

Oolong tea contains epigallocatechin gallate (EGCG), according to a research review. EGCG is one of the superstar components of green tea that gives it many of its benefits — like helping to prevent memory loss and cognitive declines. So, sip early and sip often for brain health!

2. Improves blood sugars

Don’t call me sweetheart! Oolong tea, like green tea, may help improve blood sugar control, according to a research review and meta-analysis. Some studies have found a link between oolong tea and lower fasting blood sugar levels.

Why does that matter? Well, better blood sugar control can help reduce your risk of type 2 diabetes, unwanted weight gain, and heart disease.

3. Boosts fat loss

Sipping on oolong tea can provide the same fat burning boost as caffeine — without interfering with your sleep. In fact, according to one small study, oolong may be a bit more powerful than caffeine in helping you feel the burn.

In addition, an animal study found that oolong tea could improve fatty liver, reduce the size of fat cells, and decrease body weight and fat accumulation in rats with obesity.

4. Strengthens bones

No bones about it, drinking oolong may even be good for your spooky skelly. One study found that women who drank 1 to 5 cups of oolong tea daily had much higher bone density than non-tea drinkers.

5. Fights cancer cells

Oolong tea is full of compounds like catechins and antioxidants that might play a small role in cancer prevention, according to a 2009 research review. But it’s not as simple as “drink tea, don’t get cancer” and more research is definitely needed.

On that same note, one study found that oolong tea extracts can kill cancer cells. But it would help if you take study with a grain of salt. There’s no way to directly saturate a cancer cell inside a person who drinks tea.

6. Reduces cholesterol

One study in mice who were fed until they had excess weight found that oolong tea could improve these animals’ cholesterol and triglyceride levels, potentially decreasing their risk of heart disease. And while there’s no guarantee that we’d see the same effect in humans, there’s certainly no harm in enjoying some oolong.

7. Decreases stress

Feeling frazzled? Add a cup of oolong to your nightly self-care routine. One small study found that sipping on oolong tea could decrease heart rate variability, a measure of short-term stress, in college students.

8. Improves oral health

One in vitro study showed that oolong tea is nearly as effective as chlorhexidine mouthwash at killing the cavity-causing bacteria Streptococcus mutans — leaving green and black tea in the dust.

According to one study, it may also help promote a healthy salivary microbiome (yup, it’s a thing) by beefing up populations of beneficial bacteria. So, if you’re concerned about cavities, try giving some oolong tea a little swish.

9. Promotes a healthy gut

Although green tea is the darling of the surprisingly vast world of tea research, there’s also some promising evidence that oolong — like green tea — can promote a healthier balance of gut bacteria, which can affect everything from your digestion to your mental health.

10. Fights free radicals

Free radicals are unstable little baddies that can wreak cellular havoc when they build up in your body in high levels. (Side note: a bit of instability is OK, just check your favorite celeb’s Twitter account for proof.)

Luckily, oolong tea is rich in antioxidants, according to a research review — which have the unique ability to get free radicals to calm TF down.

11. Kills bacteria

It’s thought that the catechins in tea — like EGCG — are part of the tea plant’s defense mechanism against harmful bacteria. And in test tube studies, these various compounds do show some small bacteria-killing benefits — but that doesn’t mean you should use oolong tea instead of Neosporin.

12. Reduces menstrual pain

One observational study found that drinking green or oolong tea was associated with a less painful menstrual cycle. We’ll sip (and sip and sip and sip) to that.

13. Improves liver function

Your liver’s got a big job, clearing toxins from medication, supplements, and food to keep you in tip-top shape. And one 1996 study with rats showed that drinking oolong tea might give the liver a little boost in this regard, helping it to more effectively take out the trash.

14. Kills fungi

Oolong tea, like green and black teas, might be useful as an antifungal, according to one study — at least, it’s shown some benefit in test tube studies for killing the nasties. There’s promise there, but def don’t go rogue and try to use it as a home remedy for a fungal infection. Let’s leave that to the pros.

15. Reduces skin discoloration

According to a 2007 research review, oolong tea may be useful for reducing sun spots and discoloration on your skin caused by ultraviolet exposure. And, at least according to an animal study, the benefits may come from drinking the tea or applying it directly to the skin. Just don’t skip the sunscreen in favor of tea, or you could end up with a major D-I-Why.

16. Improves focus and concentration

According to a small research review, green tea — and partially-fermented oolong tea — contain a combination of L-theanine and caffeine, a pair that goes together like Netflix and chill… if Netflix and chill were a brain-boosting combo that could help you stay focused, avoid distractions, and retain more information.


from Greatist Health RSS Feed https://bit.ly/2O7drkh

Finally! Mattresses Made for Side Sleepers

Side sleepers know the struggle is real. Finding a mattress that’s both comfy and supportive can be a (literal) pain in the neck. But don’t worry! We did the research for you.

Here are the 11 best mattresses for side sleepers 😴.

best mattresses for side sleepers

How we chose

Here’s how we picked the crème de la crème of beds:

  • Support. Each mattress will give you optimal spinal support, so you can wake up feeling fresh.
  • Less hassle. We picked brands that offer at-home sleep trials, warranties, and easy return policies.
  • Reviews. We read the reviews and prioritized mattresses peeps love.
  • Price. There are mattresses for every budget. We also prioritized brands that offer monthly payments.

Pricing guide

We know mattresses can be pricey AF. This pricing guide will help you pick the best bed for your back and your budget:

  • $ = under $1,000
  • $$ = $1,001–$1,500
  • $$$ = over $1,500

FYI: Prices reflect queen-size mattresses and don’t include applicable shipping costs, setup fees, or tax.

The best 11 mattresses for side sleepers

Without further ado (we know you’re ready to go to bed!), here are the 11 best mattresses to fulfill your side sleeping dreams.

1. Saatva Loom & Leaf Mattress

Loom & Leaf Mattress
  • Price: $$$
  • Available sizes: Twin, twin XL, full, queen, king, split king, California king, or split California king

This mattress provides excellent contouring and pressure point relief. Reviewers say it’s extra fab for the lower back or lumbar region. It’s made with antimicrobial, hypoallergenic organic cotton and has a nontoxic natural thistle flame barrier. The gel-infused cooling layer earns it some extra brownie points.

Bonus: You get a 180-night home trial, a 15-year warranty, and free delivery. Saatva also offers a monthly payment plan.

2. Nectar Memory Foam Mattress

Nectar Memory Foam Mattress
  • Price: $$
  • Available sizes: Twin, twin XL, full, queen, king, or California king

This mattress will mold to your bod for max comfort and support. It was designed to reduce motion transfer, so it’s also a great buy if you or your partner is a restless sleeper.

The quilted memory foam adds a killer cooling touch. Plus, the top layer is moisture wicking — another perk for sweaty sleepers.

Bonus: You get a forever warranty and a 365-night home trial.

3. Casper Original Foam Mattress

Casper Original Mattress
  • Price: $$
  • Available sizes: Twin, twin XL, full, queen, king, or California king

This bad boy has three targeted support zones to help keep your spine aligned. There’s firmer foam to support your hips, waist, and lower back and softer foam for your upper back. This is woo-hoo news if you’re used to waking up with shoulder or neck pain in the a.m. Oh, and the outer foam layer is perforated to allow for better airflow.

Bonus: Casper offers free shipping and returns in the contiguous United States and Canada — but you’ll have to pay extra if you’re in Alaska or Hawaii.

4. Helix Midnight

Helix Midnight Mattress
  • Price: $
  • Available sizes: Twin, twin XL, full, queen, king, or California king

With pressure point relief at the hips and shoulders, the Helix Midnight was designed with side sleepers in mind. It has multiple layers of foam plus individually wrapped coils.

Reviewers love the breathable cover that’ll keep you cool all night long. Plus, it has a reinforced perimeter designed to support folks who like to sleep on the edge of the bed.

Bonus: Helix includes a 100-night trial with a 30-day break-in period. The mattress is also covered by a 10-year warranty.

5. Birch Natural Mattress

birch natural mattress
  • Price: $$
  • Available sizes: Twin, twin XL, full, queen, king, or California king

This eco-friendly mattress will give you Goldilocks levels of support. It’s medium-firm and has a combo of pocketed coils and a Talaylay latex layer for extra comfort. It also has layers of birch wool, which is sustainably sourced from individual farms in New Zealand 🐑.

Bonus: Birch offers a 100-night sleep trial, free shipping, and a 25-year warranty.

6. Sealy Cocoon Chill Soft Foam Mattress

sealy cocoon chill soft foam mattress
  • Price: $$$
  • Available sizes: Twin, twin XL, full, queen, king, or California king

This one’s great if you love options. It comes in extra-firm or medium-soft. The dense foam provides top-notch support for side sleepers, but belly or back sleepers can rest easy too. It’s covered in a stretch-knit material meant to reduce your risk of a late night heat wave.

More good news: It’s lighter than other options and comes in a compact box, so it’s easy to carry and assemble.

Bonus: You get a 100-night trial period and a 10-year limited warranty, which includes a money-back guarantee. And both shipping and returns are free.

7. WinkBed

winkbed mattress
  • Price: $$$
  • Available sizes: Twin, twin XL, full, queen, king, or California king

This bed gives you the best of both worlds with a hybrid design. It rocks a Euro-pillow top with gel foam, a Tencel cover, extra support at the edges, and individually wrapped pocketed coils. The medium-soft model also has an extra layer of transitional polyfoam that should keep you from sinking.

Bonus: WinkBed offers a 120-night sleep trial and a lifetime warranty. Woot 😉!

8. Amerisleep AS4

amerisleep mattress
  • Price: $$$
  • Available sizes: Twin, twin XL, full, queen, king, California king, or split king

Get ready for support from head to toe. This medium-soft mattress has multiple layers of padding to hug your hips and shoulders. It was designed to stave off sagging spots, so it should stand the test of time. The mattress also boasts an open-cell design that filters out warm air better than traditional foam.

Bonus: It comes with a 20-year manufacturer’s warranty, a 100-night trial, and free shipping. We also love that it’s made in an eco-friendly factory with plant-based materials 🌿.

9. TEMPUR-Adapt

tempurpedic adapt mattress
  • Price: $$$
  • Available sizes: Twin, twin XL, full, queen, king, California king, or split California king

This bed has a beautiful blend of firm support and cushy comfort. The signature Tempur memory foam was originally designed by NASA, so you know it’s legit. The mattress also has an antimicrobial cover to ward off uninvited guests like dust mites, mold, and dander.

You can go with the standard model (which is awesome on its own) or the Medium Hybrid, which has a framed layer of individually wrapped coils for extra support.

Bonus: It’s def an investment, but it comes with a 10-year limited warranty, a 90-night trial, and free delivery.

10. Idle Hybrid

idle hybrid mattress
  • Price: $$$
  • Available sizes: Twin, twin XL, full, queen, king, split king, or California king

This flippable model is two-sided — one side is firm and the other is medium-firm. Both surfaces have transitional layers designed to evenly distribute weight and mold to your bod. The polyfoam helps cushion your hips and shoulders while aligning your spine. Fans also love the Thermocool fabric cover, which adds a cooling touch.

Bonus: Idle offers an 18-month risk-free sleep trial and a lifetime warranty. Plus, returns are free!

11. Serta iComfort Foam CF4000 with Max Cooling & Pressure Relief Upgrade

serta icomfort foam cf4000 mattress
  • Price: $
  • Available sizes: Twin, twin XL, full, queen, king, or California king

Serta’s iComfort line is next-gen cozy. It’s made with carbon fiber and air support foam, and it even offers temperature regulation. It’s a 10/10 choice for side sleepers or folks with chronic back pain. Reviewers say it “cradles” their bodies. It can also reduce shoulder and neck tension.

You can choose from firm, plush, or ultra plush varieties.

Bonus: Serta offers a 10-year limited warranty and a 120-night trial.


from Greatist Health RSS Feed https://bit.ly/3aZkS6q

Hobo Foil Packets: Sausage And Pepper On Sourdough Crostini

Yields: 4 servings

Prep Time: 10 minutes

Cook Time: 40 minutes

What Is A Hobo Foil Packet?

A hobo foil packet is a quick, simple meal solution popular among campers. It’s a bundle of cut-up ingredients that are packed into some foil and thrown on top of the campfire. Don’t have a campfire? No sweat. Let your kids make their own foil pack and pop ’em in your oven for a fun and super simple family night meal.

Sausage And Peppers On Sourdough Crostini Ingredients

  • 1 pound chicken or turkey sausage
  • 2 red bell peppers, sliced
  • 2 green bell peppers, sliced
  • 1 large sweet onion
  • 8 Crimini mushrooms, sliced
  • Thyme, fresh sprigs
  • Dried Oregano
  • Sourdough bread
  • Marinara sauce
  • Foil

Hobo Foil Packet Directions

  1. Preheat oven to 375.
  2. Remove sausage from casing. Section sausage into quarter-size balls (they don’t have to be perfectly round).
  3. Place sausage, peppers, onion, mushrooms, 1-2 sprigs of thyme, and a dash of oregano on a 10″ foil sheet.
  4. Top with a second sheet of foil and fold edges together to create a packet. Makes about 4 hobo packs.
  5. Place packs on a baking sheet. Cook for 35 minutes.

NOTE: Do not open packets to check them. Removing the steam will slow the cooking process.

Sourdough Crostini Directions

  1. Place 1 tablespoon oil in a pan on medium heat.
  2. Toast each side of sourdough bread.
  3. Serve sausage and peppers on toast with a side of sauce.


hobo foil packets sausage and peppers step by step

The post Hobo Foil Packets: Sausage And Pepper On Sourdough Crostini appeared first on Born Fitness.


from Blog – Born Fitness https://ift.tt/37Qz8Mu

Under Pressure: 10 Best Mattresses for Pressure Points

Tired AF of getting outta bed in pain? It might be time to change your mattress! If waking up to a sore back, hip, neck, or shoulders is the norm, you prob need better pressure point support.

We made things easy for you and searched the internet for the best mattresses for pressure points. Browse through our top picks to find a mattress that’ll soothe your pain and help you doze off.

10 best mattresses for pressure points

  1. Best for back support: Saatva Classic Mattress
  2. Best for hot sleepers: Nectar Lush Mattress
  3. Best for stomach sleepers: Dreamcloud Luxury Hybrid Mattress
  4. Best hybrid mattress: Brooklyn Signature Hybrid Mattress
  5. Best foam mattress: Casper Original Mattress
  6. Best for couples: The Winkbed
  7. Best flippable mattress: Idle Hybrid Mattress
  8. Best for side sleepers: Leesa Original Mattress
  9. Best organic mattress: Avocado Green Mattress
  10. Best under $500: Sunrising Bedding Mattress
best mattress for pressure points

Can a mattress soothe pressure point pain?

Pressure points are the spots on your body where you feel the most pressure when lying down. They can vary depending on the position you sleep in. For example, if you’re a side sleeper, you might feel more pressure on your hips and shoulders.

Luckily, if it feels like you’re under a lot of pressure to get a good night’s sleep, the right mattress can help!

A 2011 study suggests that a saggy mattress can mess with your rest, especially if you sleep on your stomach or on your side. The best mattresses for pressure points may relieve pain by supporting the natural curve of your spine while you sleep.

Still looking for more relief? You can also try sleeping with a pillow between your knees (if you’re a side sleeper) or underneath your knees (if you sleep on your back). This can help decrease the pressure on your hips, knees, and back while you’re snoozin’.

10 best mattresses for pressure points

After searching the internet, we bring you the *very* best mattresses for pressure points on the market. We made sure to include quality options for every budget.

Pricing guide

Searching for the best pressure point relief mattress for your money? We’ve got you.

  • $ = under $1,000
  • $$ = $1,000–$1,500
  • $$$ = over $1,500

Prices are based on a standard queen size.

1. Best for back support: Saatva Classic Mattress

best mattress for pressure points saatva

Price: $$
Type: Hybrid

If you’re looking for a hybrid mattress that can alleviate your pressure point pain by giving you some extra back support, the Saatva Classic might be your new BFF!

You can choose from three firmness options and two heights. It’s made with a mix of coils and memory foam, and the pillow top has CertiPUR-US certified foam. All these features combine to help you relieve pressure in your hips, back, and shoulders.

2. Best for hot sleepers: Nectar Lush Mattress

best mattress for pressure points nectar

Price: $$$
Type: Foam

Dreaming of a mattress that’ll cool your #HotBod while keeping pressure point pain at bay? Enter: The Nectar Lush Mattress.

It’s a great choice for hot sleepers because it comes with a cooling cover and it has gel-coated, CertiPUR-US certified memory foam to help regulate your body temp.

3. Best for stomach sleepers: Dreamcloud Luxury Hybrid Mattress

best mattress for pressure points dreamcloud

Price: $$$
Type: Hybrid

If you’re a stomach sleeper, you might’ve had a hard time finding a mattress that helps you stay supported. Well, we’ve got news for you: The Dreamcloud Luxury hybrid might be just what you need!

With four layers of memory foam and innersprings covered by a quilted cashmere and foam cover, this mattress was built for both support and comfort.

Bonus: You’ll get a full 365-night trial to see if this is the one for you and a lifetime warranty if anything goes wrong.

4. Best hybrid mattress: Brooklyn Signature Hybrid Mattress

best mattress for pressure points brooklyn

Price: $
Type: Hybrid

The Brooklyn Signature is a hybrid mattress (meaning it’s made from both springs and foam) that promises support without comprising comfort. It’s a great budget-friendly choice for pressure point relief.

You might prefer this supersupportive hybrid option if you’re a side sleeper. One study suggests that people who sleep on their backs prefer softer mattresses than those who sleep on their sides.

Feeling like Goldilocks? You can also choose from three firmness levels to find the comfiest one for you, depending on your favorite sleeping position.

5. Best foam mattress: Casper Original Mattress

best mattress for pressure points casper

Price: $$
Type: Memory foam

This memory foam mattress includes “Zoned Support.” That’s Casper’s name for a three-section layer of foam that has softer foam under your shoulders and firmer foam supporting your hips. It promises to help you stay aligned while you sleep, so you can avoid any pain on pressure points.

The Original Casper is a bestseller for a reason. You’ll also get free shipping, a 100-night risk free trial, and a 10-year limited warranty.

6. Best for couples: The Winkbed

best mattress for pressure points winkbed

Price: $$$
Type: Hybrid

The Winkbed is a hybrid mattress designed specifically to help you get rid of muscle tension. It promises to optimize your spinal alignment, too, which makes it a safe choice for a pain-free night of sleep.

The Winkbed is also a perfect pick for couples. Why? Because the combo of gel foam and steel pocket springs works to minimize the amount of movement you can feel from one side of the bed to the other.

7. Best flippable mattress: Idle Hybrid Mattress

best mattress for pressure points the idle

Price: $
Type: Hybrid

If you’re on the hunt for a hybrid mattress that’ll last for ages, The Idle Hybrid might be for you. The secret to its durability is that it’s flippable, meaning you can switch between the two sides of the mattress to make it last longer. Pretty flipping cool, right?

You can also choose your preferred firmness level for both sides of the mattress at no extra cost. If you’re clueless about which firmness level might work best for you, the company can also provide personalized recs.

8. Best for side sleepers: Leesa Original Mattress

best mattress for pressure points leesa

Price: $$
Type: Foam

Side sleeper looking for the best mattress to soothe your pressure points? Say hello to the Leesa Original Mattress! This all-foam mattress is perfect for side sleepers who deal with pressure point pain, because it’s comfy but not superplush.

It also comes with a top layer of breathable foam for maximum airflow and a core support layer that promises to give you the support you need for a good night of sleep.

9. Best organic mattress: Avocado Green Mattress

best mattress for pressure points avocado

Price: $$
Type: Hybrid

The Avocado Green Mattress is the perfect choice if you’re looking for a hybrid mattress that’ll reduce both your pressure point pain and your environmental impact.

A bit on the firmer side, this hybrid is certified organic and made with Global Organic Textile Standard (GOTS) certified wool and cotton, and it comes with five different ergonomic zones to help you sleep better.

10. Best under $500: Sunrising Bedding Mattress

best mattress for pressure points sunrising

Price: $
Type: Hybrid

Looking for a lush quality mattress at a friendly price? It’s here, and it’s called Sunrising Bedding! This hybrid is made with 100 percent organic latex from the sap of the Malaysian rubber tree, and it comes with a fancy cashmere wool cover.

A 2017 study suggests that latex mattresses might be better at reducing body pressure than polyurethane ones. (Polyurethane is another common material used in memory foam mattresses.) That means the Sunrising Bedding mattress is not only a budget-friendly option but also a great choice for pressure point relief.

How we chose

To land on our list of top picks, each of these mattresses had to:

  • be certified as safe by a third party
  • comply with the Federal Flammability Standard, 16 CFR part 1632 and 16 CFR part 1633
  • come from a company that doesn’t have an F or D rating from the Better Business Bureau
  • come with a trial period

Tips for choosing your mattress

Whether you sleep hot or cold, on your back or your side, there’s sure to be a mattress out there that’ll help you sleep pain-free. Keep these factors in mind to find the right one for you:

  • price
  • materials
  • firmness level
  • temperature regulation
  • motion isolation
  • edge support
  • consumer feedback

For a match made in heaven, you’ll want a mattress that will not only help alleviate your pressure points but also give you the right amount of support, so you can keep a good posture while you sleep.

If you’re not sure what feels the comfiest to you, go for a medium-firm mattress. One review of studies concluded that a medium-firm mattress might be best for sleep quality and spinal alignment.

The bottom line

If you’re done with waking up in pain and you want a good night of sleep, a mattress designed to reduce pressure point pain could be a lifesaver. Check out our top picks to find the perfect mattress for your needs and start your morning feeling fresh as a daisy!


from Greatist Health RSS Feed https://bit.ly/3dQZPF0

Most Viewed

Yoga For Healing...TakeYour Next Step To Wellness

Popular Posts